Documentation Table of Contents ▾
WiFiZoneVPN Documentation
Welcome to the official WiFiZoneVPN documentation, your complete solution for managing your MikroTik hotspots with Mikhmon online.
Mikhmon Online
Hosted web interface to manage your hotspot
Secure L2TP VPN
Encrypted connection between your routers and the server
Simplified management
Intuitive dashboard for all your services
Full Video Tutorial
Follow our step-by-step video guide to set up your WiFiZoneVPN in under 10 minutes!
- Account creation
- MikroTik configuration
- Mikhmon access
- Customer management
Duration: ~10 minutes | Watch on YouTube
Quick Start
Follow these 3 simple steps to get started with WiFiZoneVPN:
1 Create your account
Sign up at wifizonevpn.net/register
- Enter your username, email and password
- Verify your email (confirmation link sent)
2 Create your first VPN account
Log in with the credentials you created
From the dashboard, click "Add router"
- Choose your MikroTik's RouterOS version
- Give your router a name (e.g: mikhmon1) — if it's your first router, your Mikhmon will have the same name
- Receive your custom URL:
yourname.wifizonevpn.net
3 Configure your MikroTik
Copy the provided script and paste it into your MikroTik's Terminal
- The script automatically configures the VPN connection
- Your router connects to the server
- Access Mikhmon via your custom URL
Create a Mikhmon
What is a Mikhmon?
Mikhmon (MikroTik Hotspot Monitor) is a web interface that makes managing your MikroTik hotspot easier. With WiFiZoneVPN, your Mikhmon is hosted online and accessible from anywhere.
Compatible RouterOS versions
Mikhmon V1
RouterOS 6.x to 7.9
- Compatible with older versions
- Stable and proven
- For RB750, hEX, hAP lite routers, etc.
Mikhmon V2
RouterOS 7.10 to 7.20+
- Compatible with newer versions
- Advanced features
- For recent routers
Creation procedure
1 Go to the dashboard
Log in to your account and click "Add router"
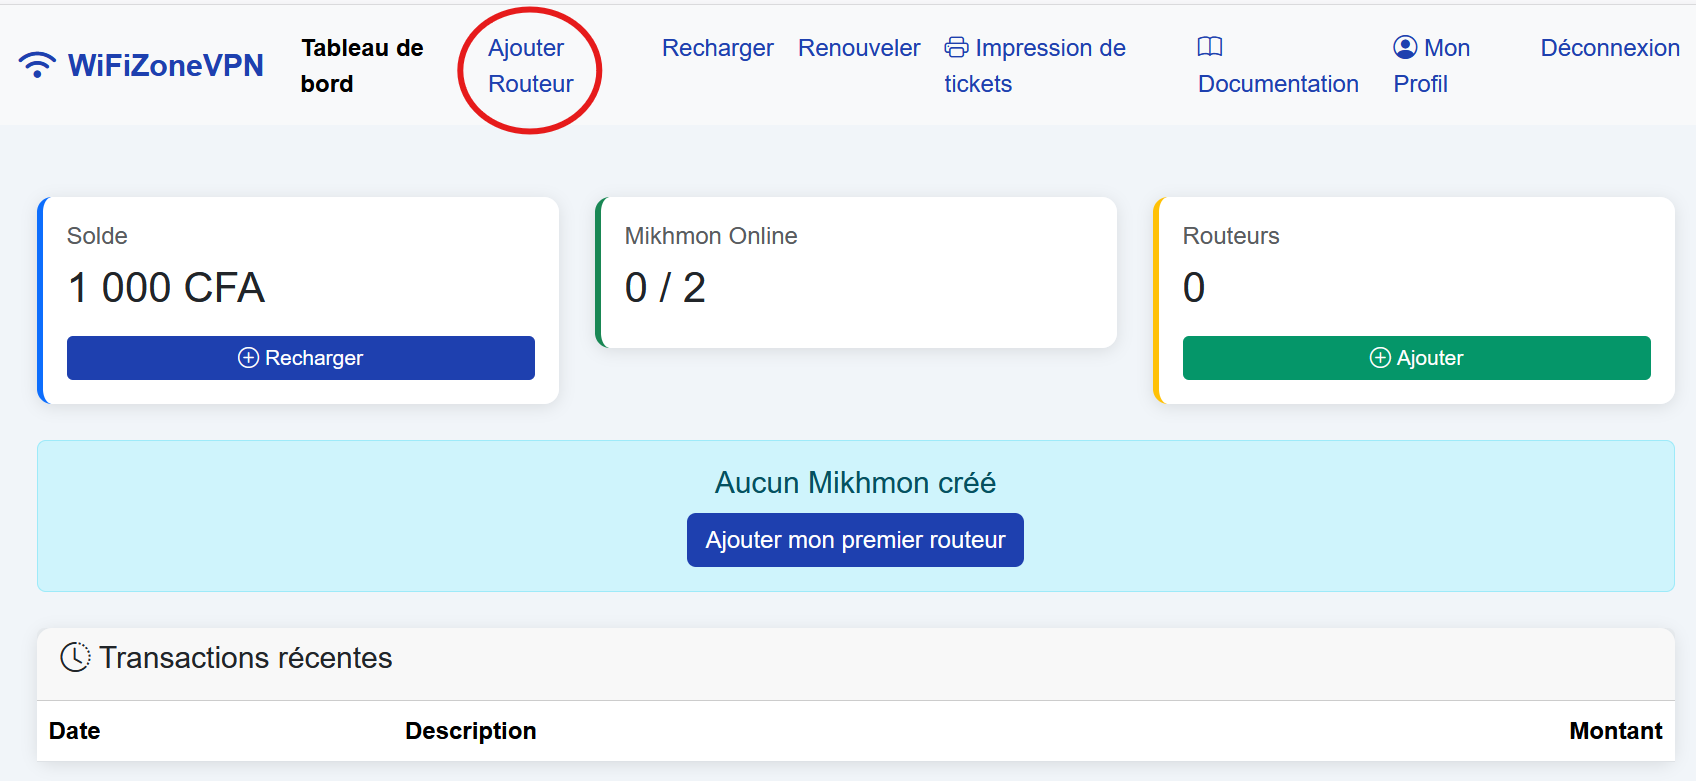
Screenshot: Dashboard with "Add router" button
2 Choose the RouterOS version
Select the version matching your MikroTik router:
- 6-7.9 for older versions
- 7.10+ for newer versions
In Winbox: System → Resources → Version
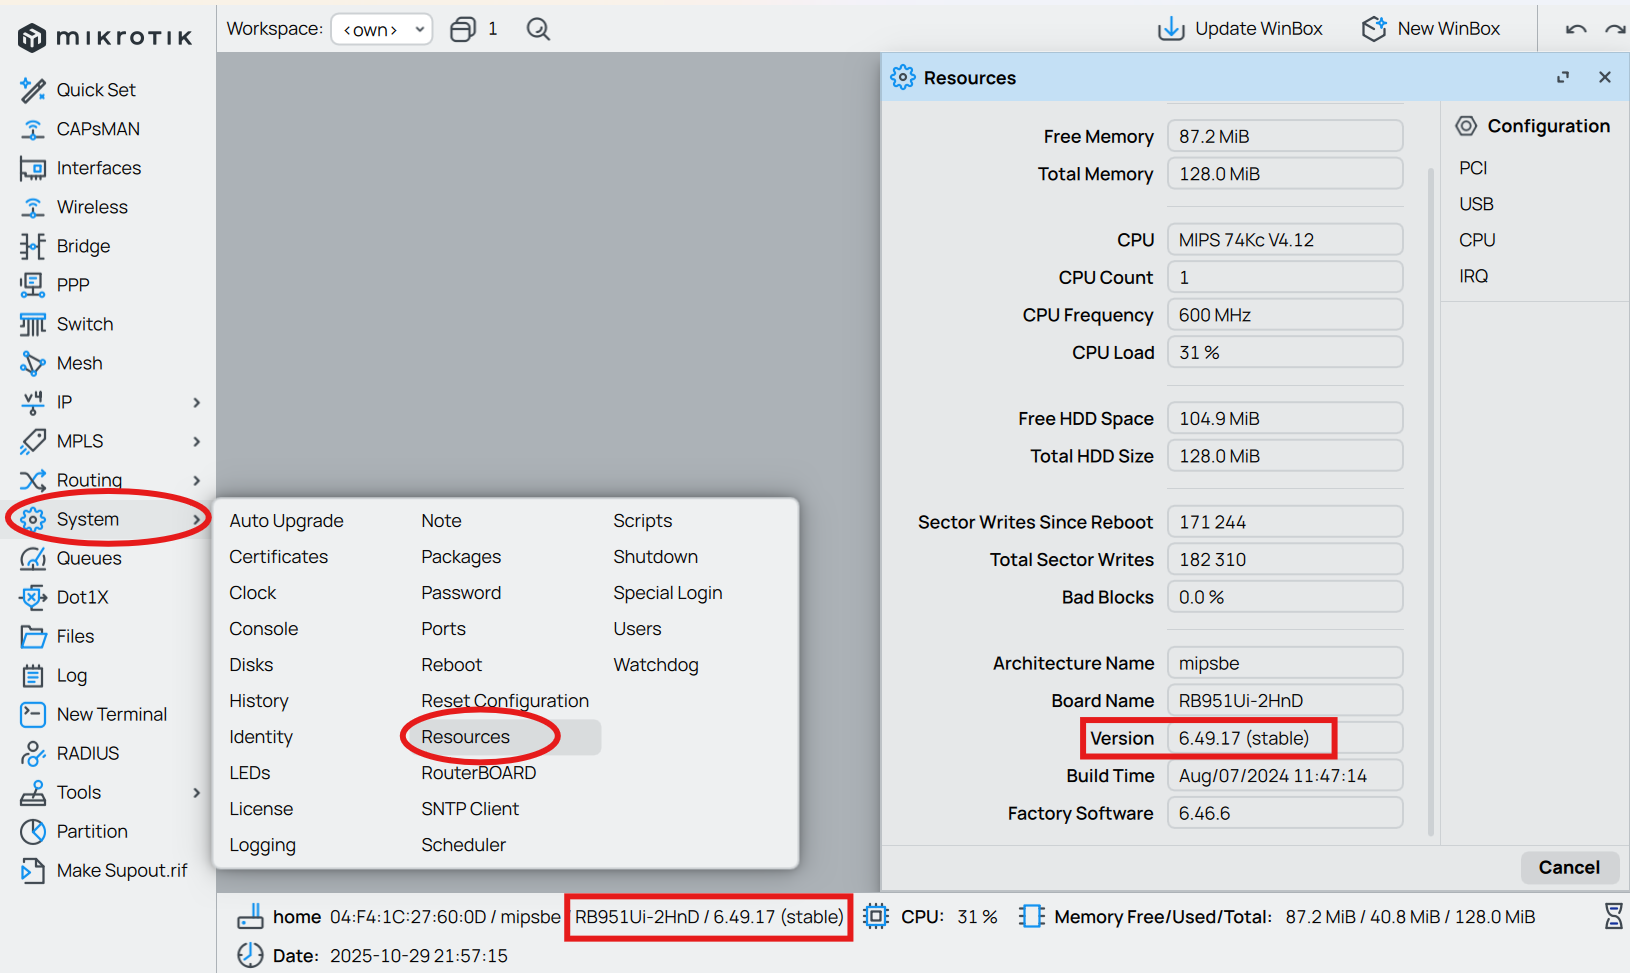
Screenshot: Winbox login window
3 Name your router (and Mikhmon if it's your first)
Enter a unique name (letters and digits only, no spaces)
Example: mikhmon1, hotspot2025
Your URL will be: votrenom.wifizonevpn.net
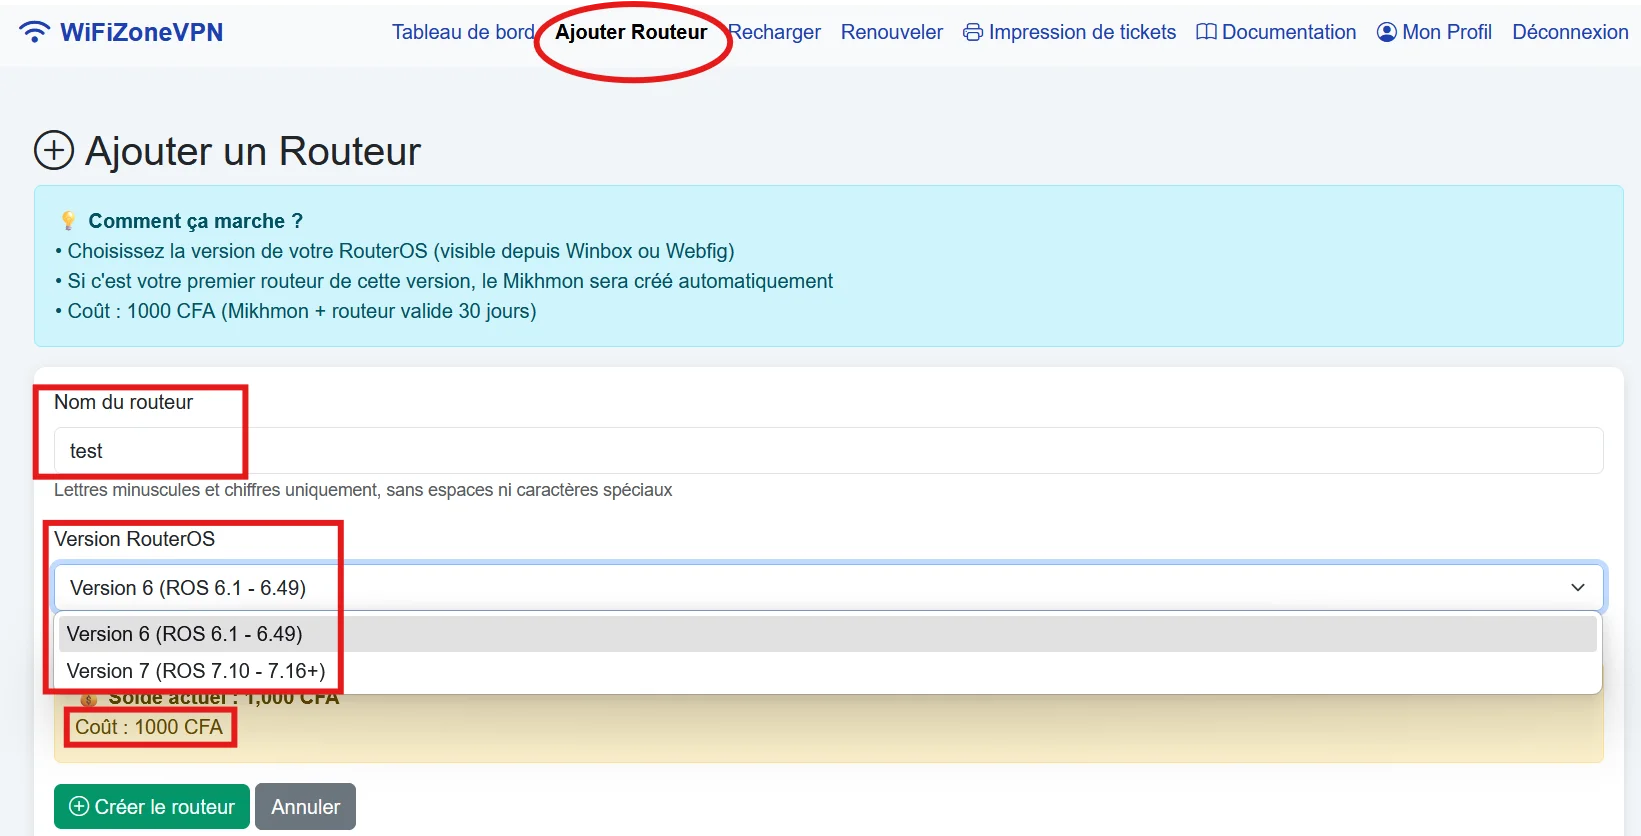
Screenshot: Mikhmon name field
4 Confirm creation
Cost: 500 CFA / month
The amount will be deducted from your balance and you will receive:
- Mikhmon URL:
https://yourname.wifizonevpn.net - Webfig URL:
http://webfig.yourname.wifizonevpn.net - API port:
vpn.wifizonevpn.net:40xxx - Winbox port:
vpn.wifizonevpn.net:50xxx - MikroTik script to copy-paste
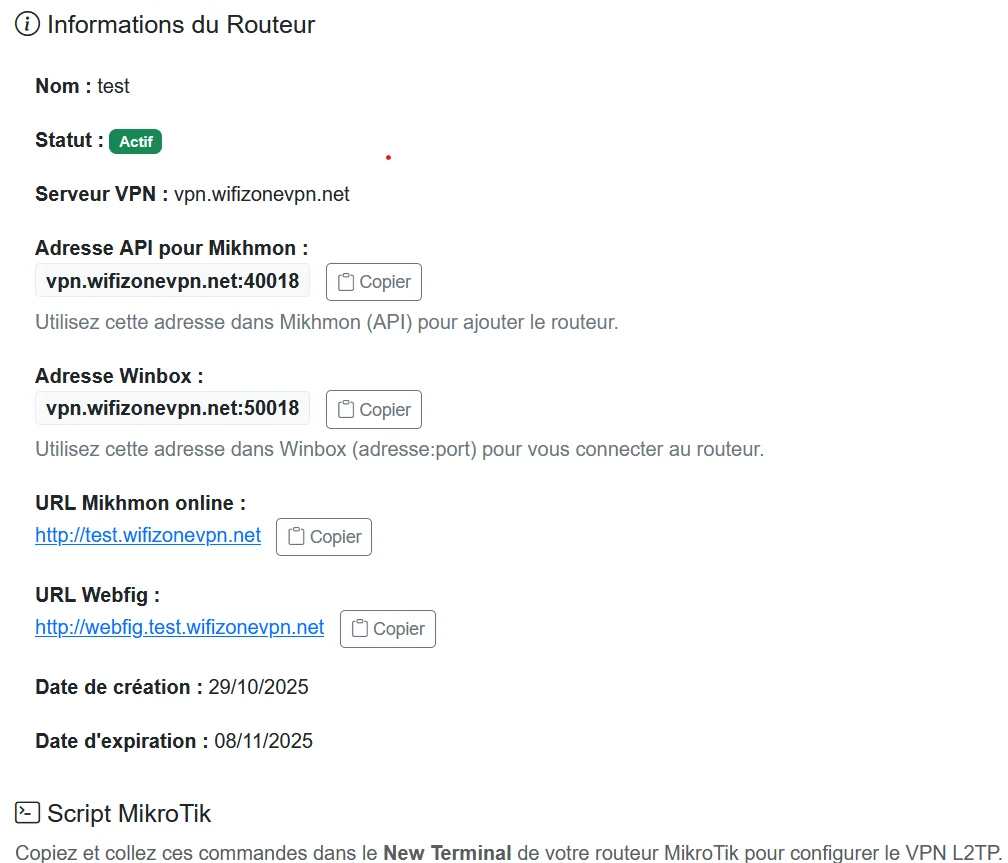
Screenshot: Confirmation page with all the info
MikroTik Configuration
Prerequisites
- MikroTik router with Internet access
- Winbox or WebFig for administration
- Script provided by WiFiZoneVPN
Method 1: Via Winbox (Recommended)
1 Log in to Winbox
Open Winbox and log in to your MikroTik
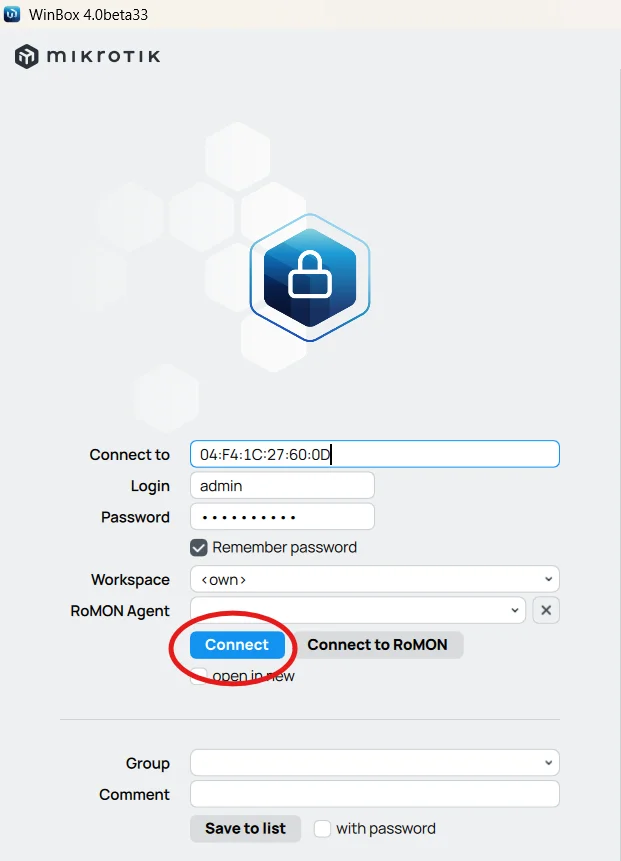
Screenshot: Winbox login window
2 Open New Terminal
Menu: New Terminal or shortcut Alt + T
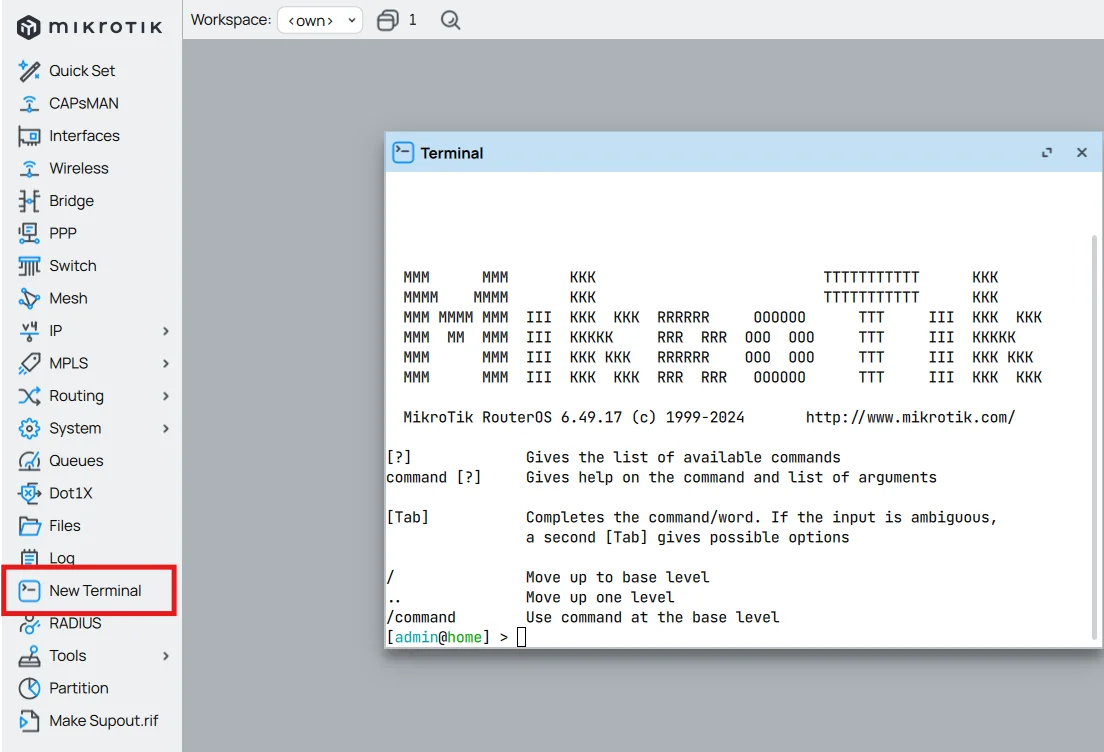
Screenshot: New Terminal button in Winbox
3 Paste the script
Copy the script provided by WiFiZoneVPN and paste it into the terminal
Press Enter
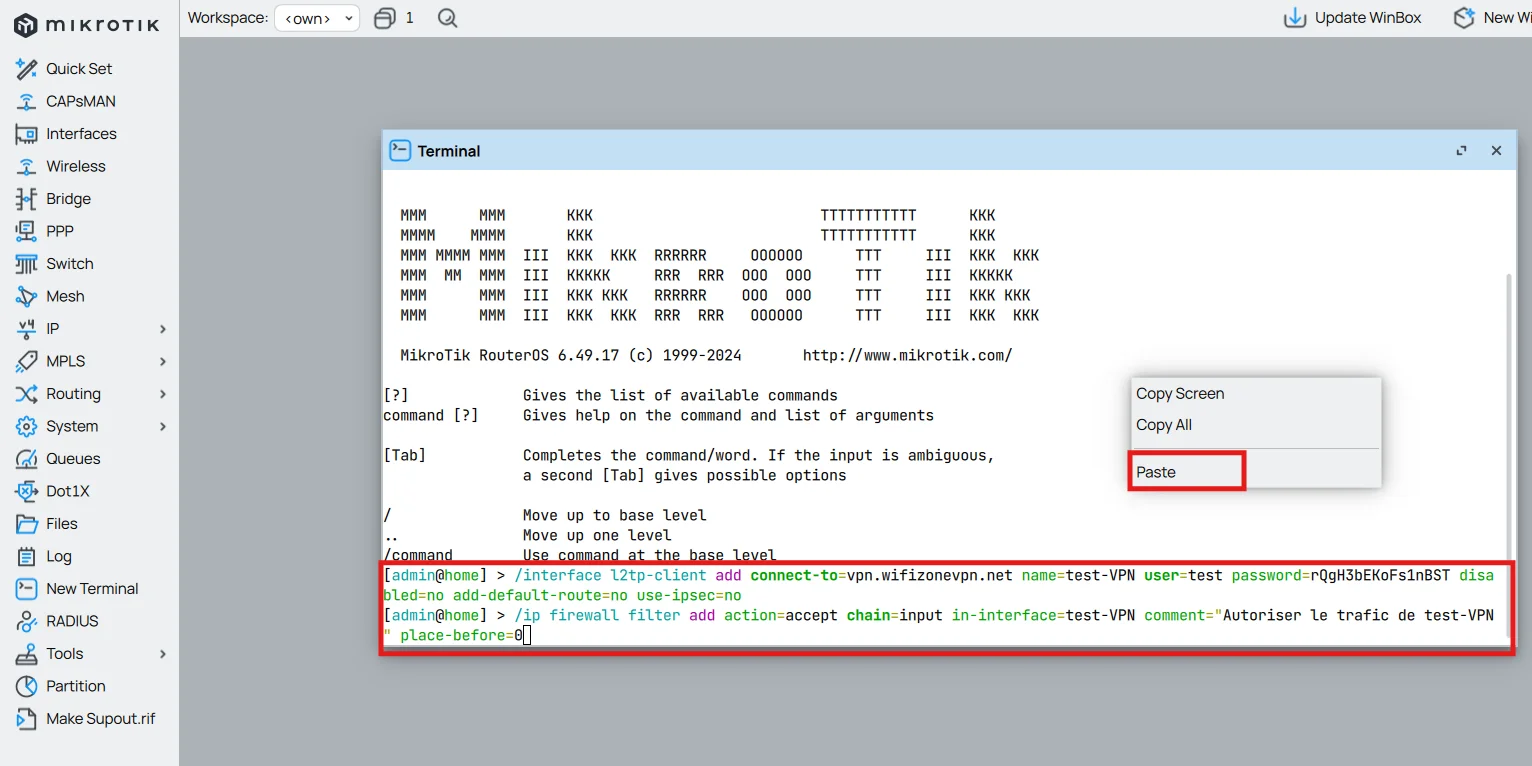
Screenshot: Script in the MikroTik Terminal
4 Check the connection
Menu: PPP → Interface
You should see your L2TP interface with the status Connected
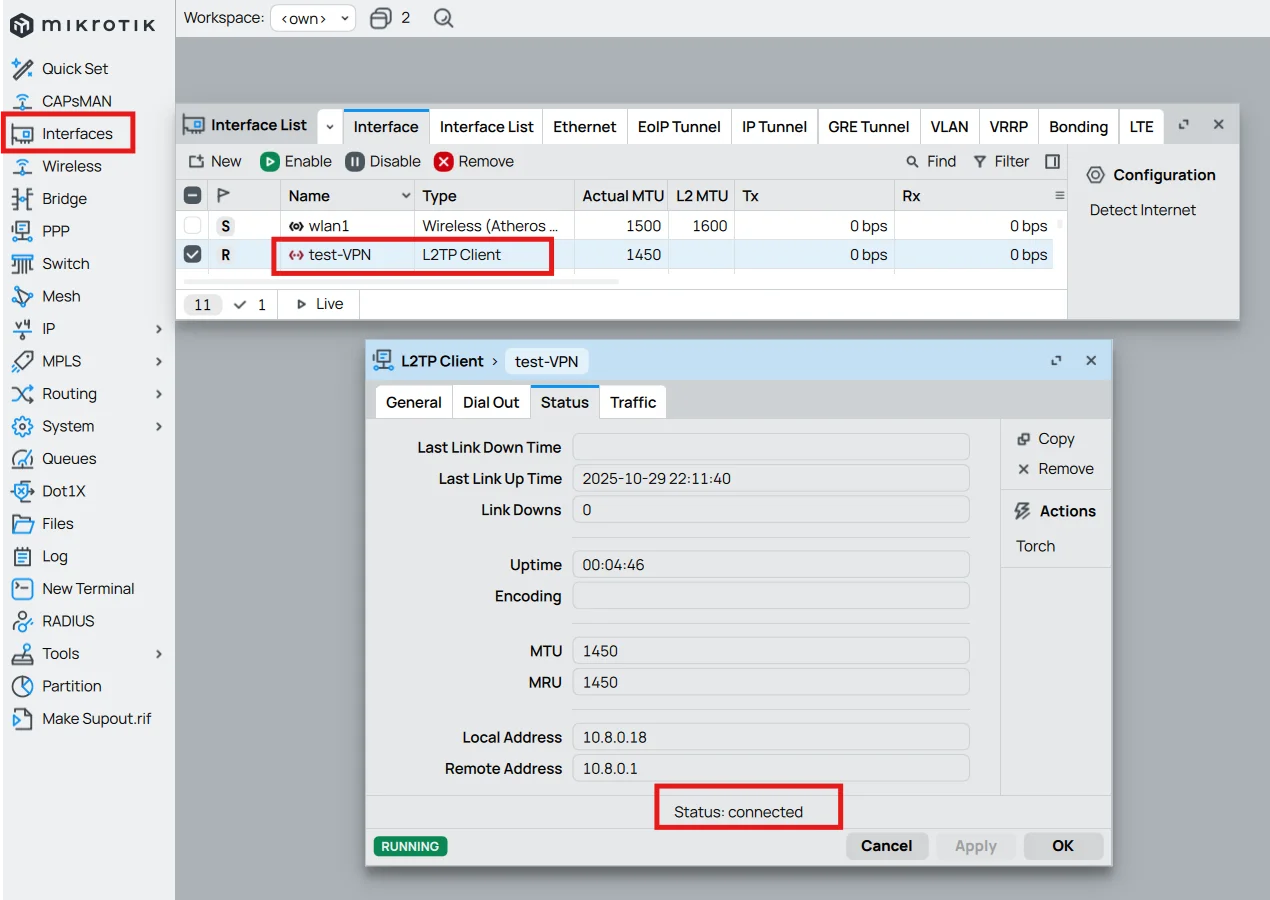
Screenshot: Connected L2TP interface
Method 2: Via WebFig
- Log in to WebFig:
http://192.168.88.1 - Menu: Terminal
- Paste the script and confirm
Verification
To check that everything is working:
/interface l2tp-client print
/ppp active print
You should see your active VPN connection with an IP address 10.8.0.xxx
Check that:
- Your MikroTik has Internet access
- UDP port 1701 is not blocked by your firewall
- You copied the entire script
Remote Access Test
1 Switch networks
Disconnect your computer from your router's WiFi and connect to a remote network (e.g: 4G).
2 Get the WinBox Address
Copy the address provided in your dashboard's router details (e.g: vpn.wifizonevpn.net:50xxx).
3 Connection
In WinBox, replace the MAC address with the WinBox address and click "Connect".
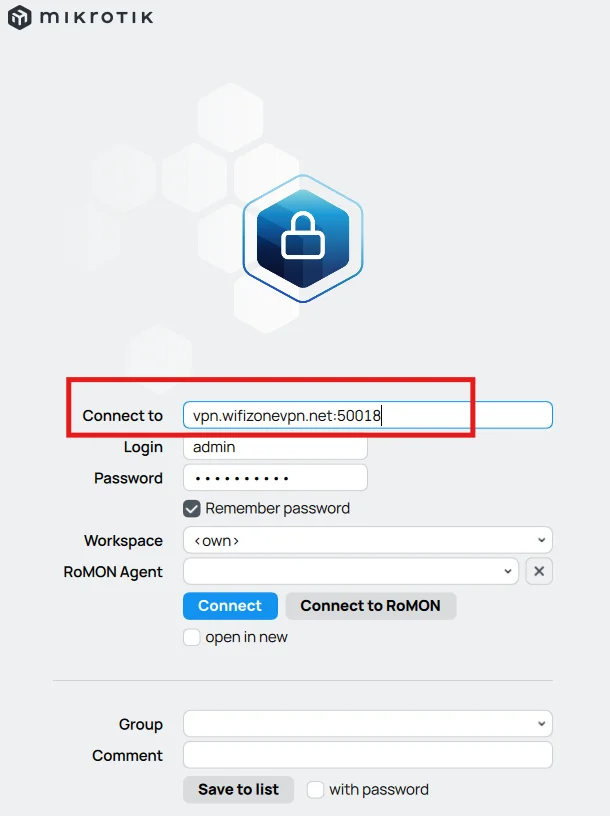
Winbox: Remote address entered
4 Result
You should now be connected to your router via VPN.
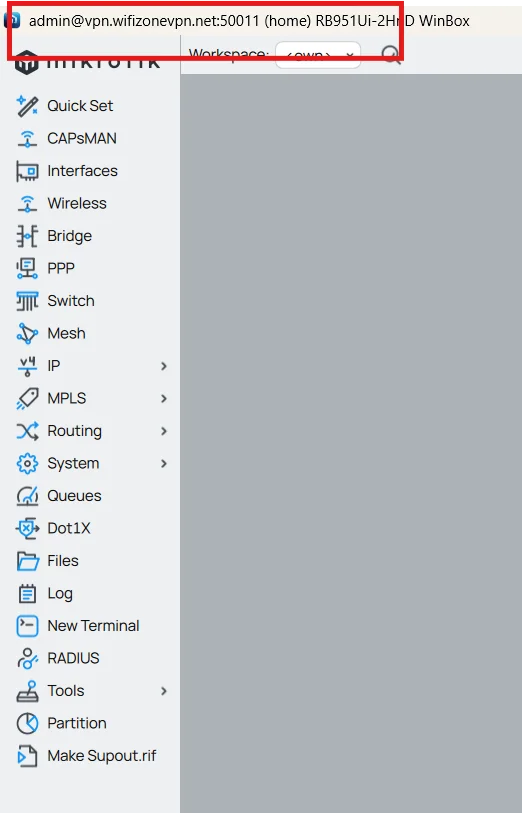
✅ Remote connection successful!
Connecting to and Configuring Mikhmon Online
1 Access Mikhmon
Copy the address provided in your dashboard's router details (e.g: https://yourname.wifizonevpn.net)
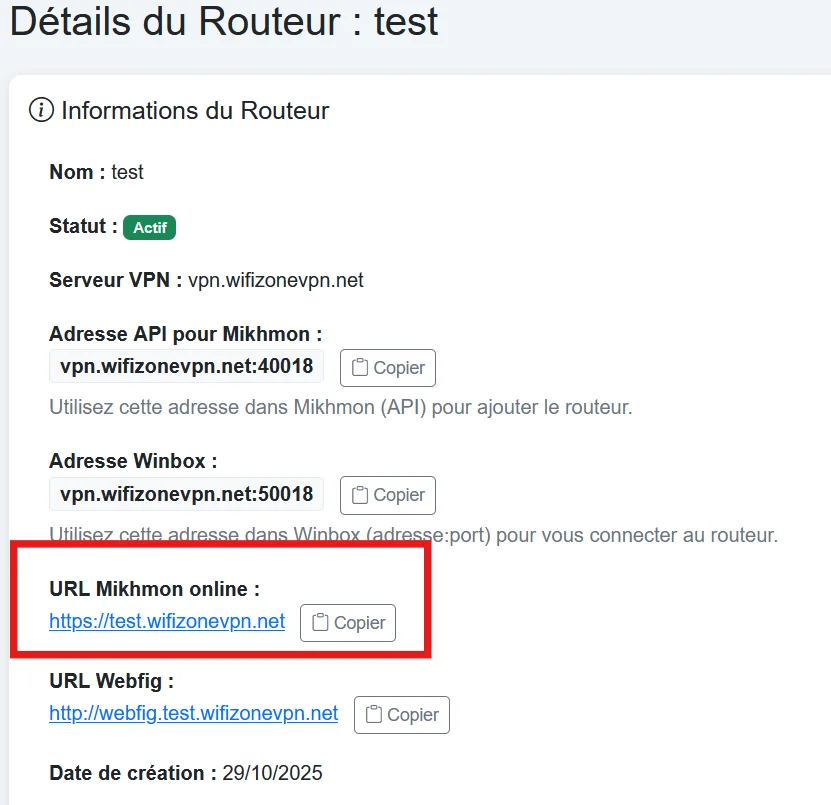
Mikhmon URL
2 Authentication
Username: admin, password: wifizonevpn.
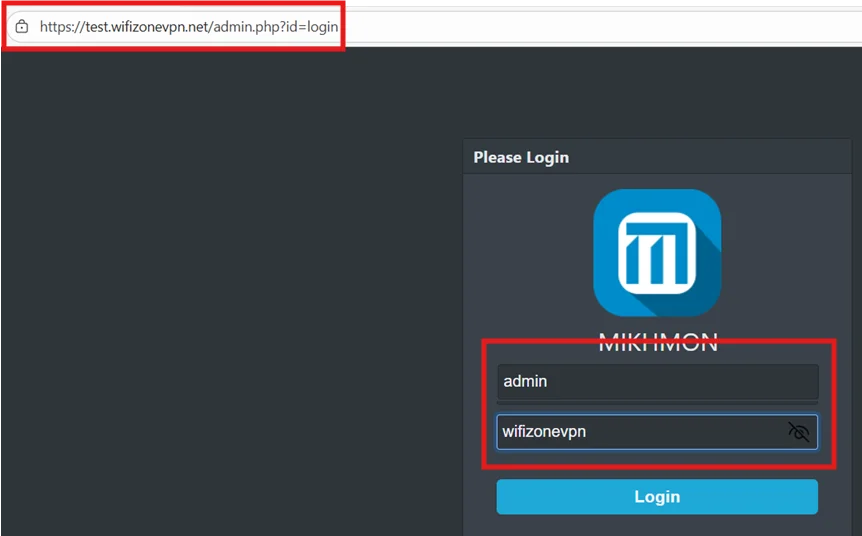
Logging in to Mikhmon online
3 Mikhmon Configuration
- Change the default password!
- Copy the address provided in your dashboard's router details (e.g: vpn.wifizonevpn.net:40xxx)
- Enter the MikroTik credentials
- Click "Save"
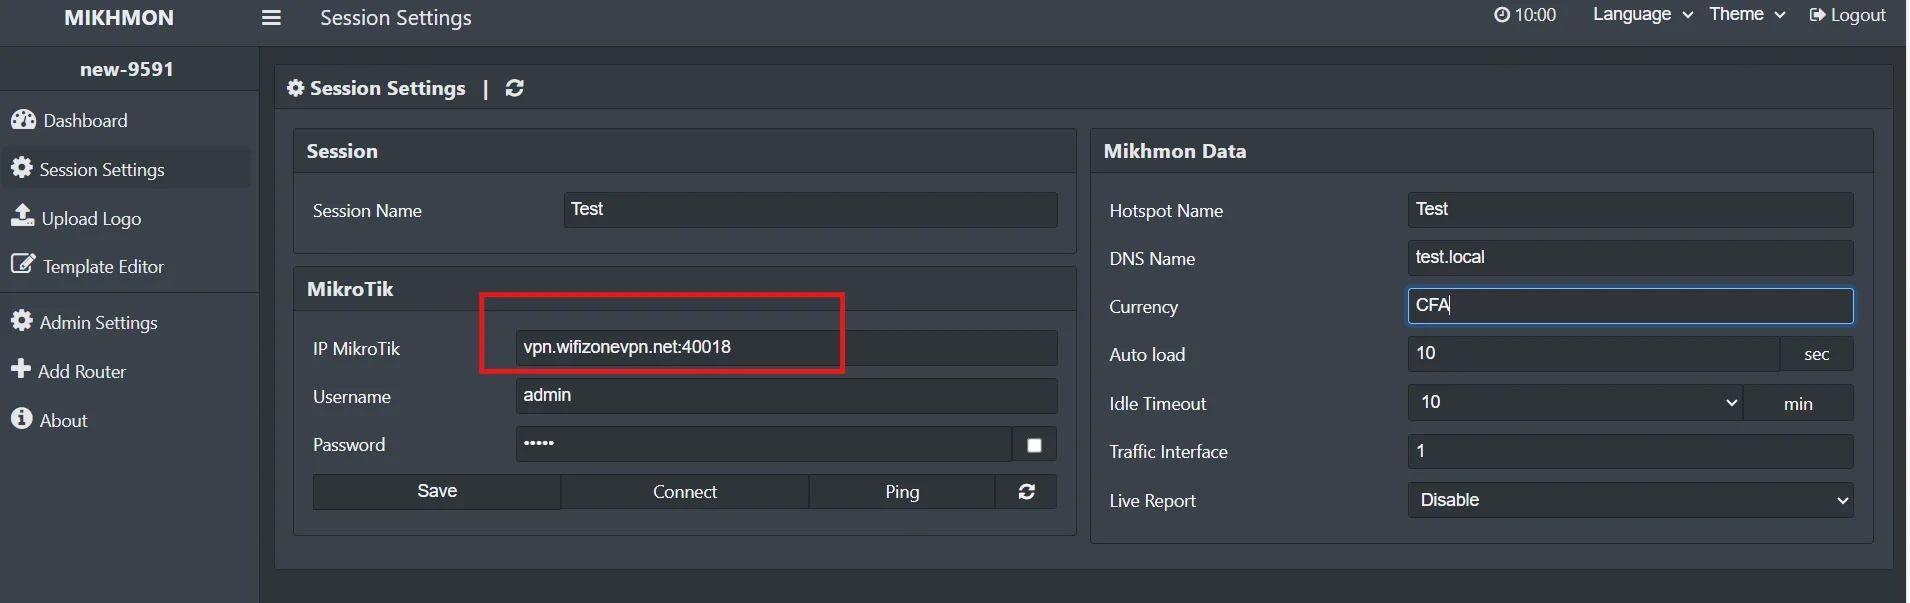
Adding a router in Mikhmon
4 Final Connection
You are connected to Mikhmon and ready to manage your customers.
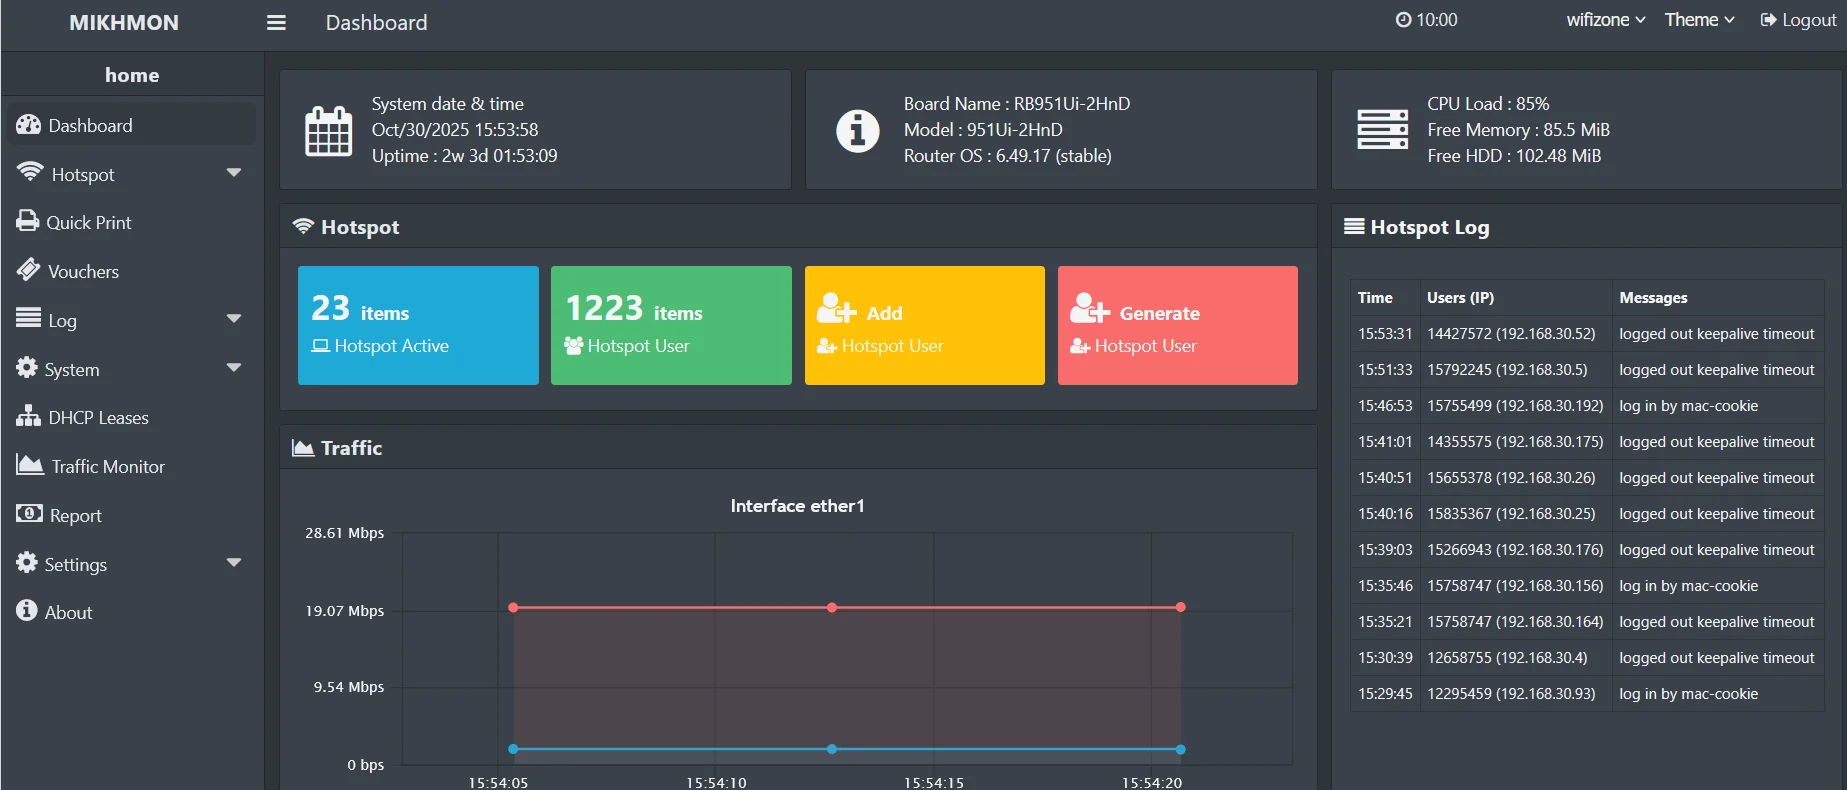
Successfully connected to Mikhmon online
Renewal
Validity period
All WiFiZoneVPN services are valid for 30 days from the creation date or last renewal.
Automatic renewal
Enable automatic renewal so you never lose access to your services:
1 Enable the option
In your dashboard, enable "Automatic renewal"
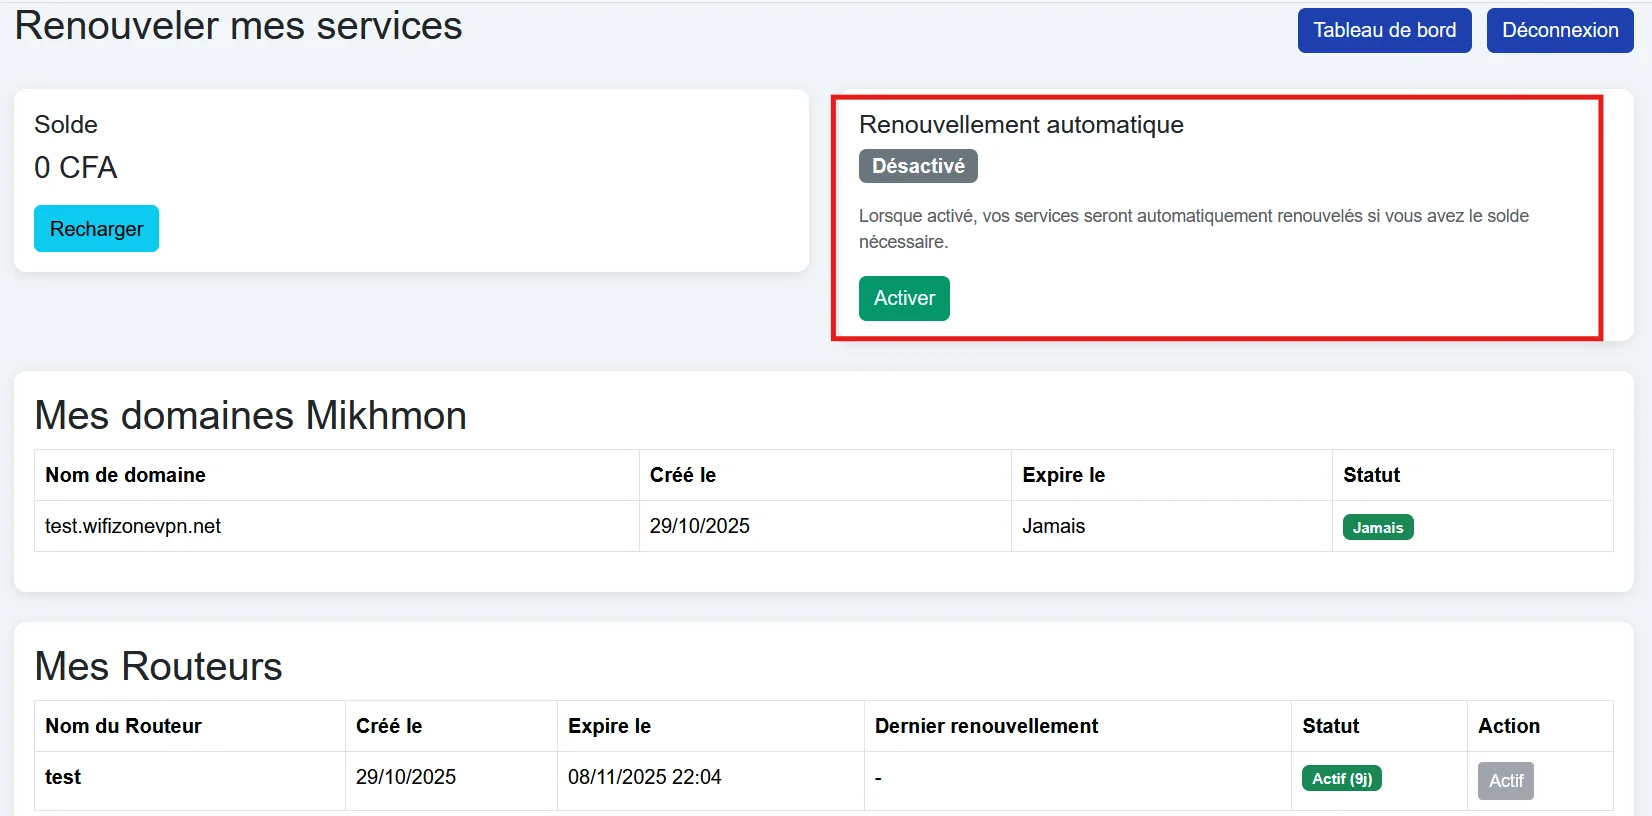
Screenshot: Automatic renewal toggle
2 Top up your account
Make sure you always have a sufficient balance (500 CFA minimum per service)
If auto-renewal is enabled and your balance is sufficient, your services will be automatically renewed upon expiry (every night at 2am). You will receive a confirmation email (and WhatsApp message if configured).
Manual renewal
- Go to the Renew page
- Select the service to renew
- Click "Renew (500 CFA)"
Expiry alerts
You will receive alert emails:
- 3 days before expiry
- On the day of expiry
What happens after expiry?
Expired router
Status marked Expired :
- ✅ Custom URL remains accessible (Mikhmon online)
- ❌ Router suspended (VPN disconnected)
- ❌ Winbox/WebFig access cut off
- ⚠️ Renew to reactivate
- ✅ Immediate reactivation after renewal
RADIUS & Roaming New · Free at launch
RADIUS solves a very common problem: a client with a still-valid voucher who can no longer reconnect because their phone's MAC address changed. Roaming goes further: if you have several routers, the same voucher can work on every router you link together.
Two features, one activation
- RADIUS alone (1 router): the client's voucher is automatically recognized on reconnect, even if their device changes MAC address or comes back after a pause.
- Roaming (several routers): on top of the RADIUS benefit, the same voucher works on every router you've linked into the same group.
Activate RADIUS on a router
- From your WiFiZoneVPN dashboard, open the details page for the router.
- Click the Activate RADIUS (Roaming) button.
- Check the consent box and confirm. Configuration happens automatically on your router — it takes a few dozen seconds, a progress bar is shown.
Generate and print RADIUS vouchers
Two ways to generate vouchers:
- From your dashboard → RADIUS · Roaming tab: a generation form with the same options as Mikhmon (quantity, code format, length, characters, comment), batch printing, filter by day/month.
- Directly from Mikhmon, on the activated router: User List Roaming and Generate Roaming menus appear automatically under Hotspot → Users, identical to the native Mikhmon menus.
Link several routers together (Roaming)
Once RADIUS is active on at least two of your routers, open the RADIUS page on your dashboard and click Link to other routers for one of them. Choose an existing group or create a new one: every router in the same group now shares the same vouchers.
Good to know
- A RADIUS/Roaming voucher is not shareable between two devices at the same time — if the same code is used elsewhere, the latest connection takes over (the old session is freed automatically, usually within a minute).
- If a router is suspended, RADIUS/Roaming vouchers stop working on it until it's reactivated — keep that in mind before printing a lot of vouchers in advance.
- 100% reversible: deactivation removes nothing and never touches your existing local vouchers.
Frequently Asked Questions (FAQ)
Example:
7.15.2 (stable) → Use Mikhmon V2Example:
6.49.10 (long-term) → Use Mikhmon V1 - Your MikroTik has Internet access
- UDP port 1701 is not blocked by your firewall
- The script was copied in full
- In PPP → Interface, check the connection status
- KomiPay (Airtel Money, MyNITA, Amanata)
- Wave
- Credit card (Visa/Mastercard)
After renewal, the service is immediately reactivated.
Support
Need help? Our team is here for you!
Before contacting us
- Check the FAQ above
- Make sure your account is topped up
- Test your MikroTik's Internet connection
- Note the exact name of your Mikhmon/router